I ordered a fairing from Gustafsson Plastics for my Rebel 1100 to replace the Honda stock batwing fairing that was to short. The Honda stock was to low for my passenger. A word of caution do not do as I did by not paying attention to the fairing height. I think I thought I wanted the tallest fairing since my Sportster's fairing is really tall. That turned out to be a mistake. The fairing height was awful since I was looking directly through the top edge. So I decided to learn how to cut the fairing shorter.
Please note this is for acrylic plastic, other plastic types might need a different method.
Stock Honda fairing compared to new fairing after cutting shorter
![Image]()
The first step was to have the wife hold the Honda stock up against the Tall fairing while I looked through them both to see how much to trim. Then measure so you know how much to trim. Then I covered the new fairing with tape, both sides. I used cheap paint trim tape which was peeling off while trying to cut the plastic. I saw a video and the blue paint trim tape appears to work better. Duct tape could also be a good choice?
I then drew on the tape the out line I wanted to cut. I used the old stock fairing for my template. Next I cut along the line with a jigsaw which did not work so well for me. You can see this in the piece below ragged edges. They say to use a very fine tooth blade for the cut which I did. Larger teeth increases the risk of chipping.
![Image]()
Another method which I think is the best is to use a dremel tool with a plastic cutting disc. I ordered this accessory kit which worked perfectly to trim off the ragged edges. I would also use this if I where to cut another fairing.
Dremel Multi Tool Accessory EZ SpeedClic SC725 Accessory Set 70pc
This cut through the plastic perfectly.
I then sanded the edge with 40 grit sandpaper while shaping the cut, then 80, 340 and finally stopping with 400. I think it came out very nice and is now customizey perfectly for our height.
Road test shows almost no wind buffing at 130 kph (80 mph).
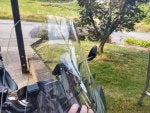
Starting point
![Image]()
Final product
![Image]()
Let me know if there are any questions and I will answer them if I can.
Please note this is for acrylic plastic, other plastic types might need a different method.
Stock Honda fairing compared to new fairing after cutting shorter
The first step was to have the wife hold the Honda stock up against the Tall fairing while I looked through them both to see how much to trim. Then measure so you know how much to trim. Then I covered the new fairing with tape, both sides. I used cheap paint trim tape which was peeling off while trying to cut the plastic. I saw a video and the blue paint trim tape appears to work better. Duct tape could also be a good choice?
I then drew on the tape the out line I wanted to cut. I used the old stock fairing for my template. Next I cut along the line with a jigsaw which did not work so well for me. You can see this in the piece below ragged edges. They say to use a very fine tooth blade for the cut which I did. Larger teeth increases the risk of chipping.
Another method which I think is the best is to use a dremel tool with a plastic cutting disc. I ordered this accessory kit which worked perfectly to trim off the ragged edges. I would also use this if I where to cut another fairing.
Dremel Multi Tool Accessory EZ SpeedClic SC725 Accessory Set 70pc
This cut through the plastic perfectly.
I then sanded the edge with 40 grit sandpaper while shaping the cut, then 80, 340 and finally stopping with 400. I think it came out very nice and is now customizey perfectly for our height.
Road test shows almost no wind buffing at 130 kph (80 mph).
Starting point
Final product
Let me know if there are any questions and I will answer them if I can.